Ford Focus ST(2013-2018) Rear Traction Bar(Rear Arm Bar)

  • En oferta
  • Precio habitual $129.95
Los gastos de envío se calculan en la pantalla de pago.


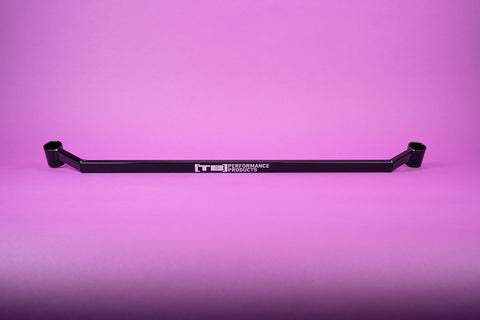
Brace these critical points to correct unpredictable oversteer and give your car improved traction and grip! The rear end of the Focus ST tends to get a little loose and unpredictable. This behavior is caused by changes in toe from the chassis shifting under load. This easy to install brace will give you greater cornering confidence without any negative consequences!

-Heavy duty CNC billet end cups

-Black Powder coat finish

-Hand TIG and MIG welded

-Reduce rear end float

-1"x1/2" Rectangular tube steel provides the ultimate in strength as well as a low profile design

-Easy install. Simply remove two bolts and bolt the brace right up

-Clears all aftermarket exhaust

-No cutting or welding

-Made in the USA


Customer Reviews

Based on 15 reviews
87%
(13)
7%
(1)
7%
(1)
0%
(0)
0%
(0)
N
N.J.
wow

Fairly easy to accomplish. pictures show an aftermarket rear toe arm but you will be looking for a stock piece if you haven't changed anything out. Remove the rear tires to make things easier. about a 12" arm that is horizontal to the car's forward movement. 15mm sockets are used for all 4 bolts. The picture for their instructions shows the jack at the rear center of the car. The left side of the image is where the tire would mount. Use a standard-size socket and impact-rated universal on an impact gun with an 8" extension. This will aid in removal. If not, get a breaker bar. You will have to work to get the bolts back in but start with the upper bolts and tighten but don't torque down. Between using my jack to raise and lower the car with jack stands under the spring mounts, pry bars, and a dead blow hammer, I was able to get the lower bolts in. Tighten, and torque as instructed.
You will feel the difference in handling when you really push the car. I noticed it on the highway where it would wander at high speeds and mid-corner on a long exit ramp where I'd left off the gas and the back would lift and feel like it was ready to rotate.

m
michael pennington
Rear lower traction bar

great price, great fit, great mod.

J
Jeff
Great product...instruction advice

I recently purchased the rear traction bar for my 16 Focus ST. Product arrived in a timely manner and in perfect condition. The bar seems sturdy and well built with a very nice gloss finish. During installation, I jacked the car up and put on stands. The toe arm bolts were on insanely tight. I decided to try to loosen the nut and remove it first. Wasnt happening. I struggled for a bit and time ran out as I had to run some errands. Mentioned it to my buddy who own's a auto mechanic's shop. I brought it by for them to look at. Turns out the nut is welded to the frame. Work on the bolt first, remove, place the recessed portion of the cup against where the bold head was originally, reinsert bolt, torque to 48 lbs....done. The rear end of the car feels much more solid and planted now. I recommend this product.

B
Brenden
Does the trick

Easy, straight forward installation. Once finished I took the car for a spin and it was a whole new car. Kept it planted on turns where I used to feel it slide or lift. Great product as always!